


Understanding Core Compatibility Factors in a Custom PC Build
Why component compatibility is critical for system stability and performance
Getting compatible parts right is absolutely essential when building a reliable custom PC, affecting how well it works from day one all the way through its lifetime. According to various industry reports, around 7 out of 10 builders run into trouble with hardware that doesn't play nice together when they skip checking compatibility first. These conflicts can cause everything from failed POST attempts to annoying thermal throttling during gameplay or workloads. When components just don't fit properly - think wrong CPU socket types or power supplies that aren't big enough for what's connected - systems simply won't boot up at all. Worse still, these mismatches lead to ongoing reliability problems that wear down hardware faster than expected. Recent studies point to motherboard and RAM combinations going wrong as the main culprit behind roughly 40-45% of stability issues among new builders. That's why taking time to match components correctly isn't just good practice, it's practically mandatory for anyone wanting their PC to last and perform consistently over time.
Common compatibility pitfalls and how they lead to build failures
Three frequent oversights derail custom PC projects:
- Form factor mismatches: ATX motherboards crammed into micro-ITX cases
- Power delivery gaps: High-wattage GPUs paired with non-modular PSUs lacking required PCIe connectors
- Cooling incompatibilities: Oversized CPU coolers blocking RAM slots
These errors often manifest as intermittent crashes under load or permanent damage to voltage-sensitive parts like CPUs and SSDs.
The role of system integration in long-term reliability
True compatibility extends beyond electrical specs to include system-wide integration:
| Integration Factor | Impact on Reliability |
|---|---|
| Thermal hierarchy | Proper GPU exhaust routing reduces case temps by 12–18°C |
| Power phase balance | Matched VRM-to-CPU requirements prevent voltage droop |
| Upgrade pathways | AM5 socket designs support next-gen Ryzen processors |
Harmonized builds reduce component stress by 30–40% compared to marginally compatible systems, according to 2024 hardware endurance tests.
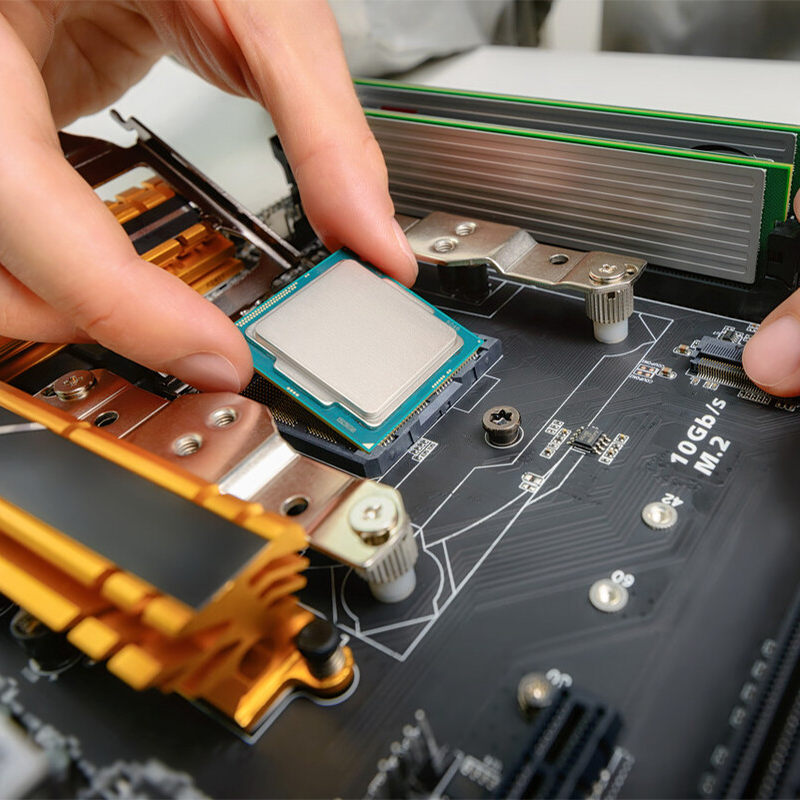
CPU and Motherboard Compatibility: Sockets, Chipsets, and Generations
Matching CPU Socket Types With Motherboard Support
Every successful build begins with exact alignment between CPU and motherboard. Modern processors require specific sockets—Intel’s LGA 1700 supports only 12th through 14th Gen Core CPUs, while AMD’s AM5 is designed for Ryzen 7000 series and newer (PCMag 2023). A mismatch prevents physical installation and renders both components unusable.
Intel vs AMD: Chipset and Generation Compatibility Considerations
The chipset on a motherboard actually controls what features are available beyond just powering up the system. Take Intel's Z790 boards for instance—they let users overclock their 13th generation processors. On the AMD side, the X670E chipset is needed to get all the benefits of PCIe 5.0 bandwidth with the new Ryzen 9000 chips. There's one big problem though when mixing newer CPUs with older chipsets. The Ryzen 7 7800X3D will physically fit into an AM4 socket like those found on B550 motherboards, but it simply won't work unless there's a BIOS update first. This compatibility issue reminds builders to check chipset specifications carefully before making hardware purchases.
Case Study: Navigating the Ryzen 7000 and AM5 Socket Transition
When AMD made the switch to AM5 in 2022, it basically said goodbye to backward compatibility as we knew it. The old AM4 platform had stuck around for years, but AM5 came with strict requirements - no choice but DDR5 memory this time around. And forget about using older CPUs or RAM sticks from previous generations. For people who jumped in early, there wasn't much to work with initially. Only those fancy X670 motherboards were on the market when things launched. Something worth remembering if building something that will last through multiple upgrades is a priority.
BIOS Limitations and Upgrade Barriers in Modern Motherboards
Matching sockets doesn't always mean compatibility when it comes to installing new CPUs. The problem often lies in outdated BIOS firmware. Take Intel's latest 14th Gen Raptor Lake Refresh chips as a case in point. These require at least UEFI version 12.0.8 running on Z690 motherboards. If a board lacks the BIOS flashback feature, there's no getting around it - someone has to put in an older processor first just to get the firmware updated. This creates real headaches for folks who aren't familiar with the process and ends up costing extra money in parts they might not want to buy.
RAM, Storage, and Interface Compatibility
Balancing RAM type, storage interfaces, and physical fit ensures optimal performance without bottlenecks. Key considerations help avoid common mismatches.
DDR4 vs DDR5: Ensuring RAM type and speed match motherboard specs
Most motherboards can handle either DDR4 or DDR5 memory but not both at the same time. The physical design of these memory modules makes them incompatible with each other's slots. Trying to force DDR4 into a DDR5 slot or vice versa could end up damaging the board permanently. Before buying any RAM, check what kind of memory your motherboard actually supports along with its top speed capabilities. Take DDR5-6000 kits for example they often run slower at around 5200 MHz when installed on boards that don't fully support their higher speeds, which basically wastes all that extra performance potential. According to recent data from PC builders in 2024, about a quarter of new computer enthusiasts missed this important compatibility issue, leading to frustrating situations where their systems wouldn't even start up properly or ran much slower than expected.
| DDR4 vs DDR5 Key Differences | DDR4 | DDR5 |
|---|---|---|
| Base Speed (MHz) | 2133 | 4800 |
| Voltage | 1.2V | 1.1V |
| Channels per Module | 2 | 4 |
XMP and DOCP: Optimizing memory profiles without instability
XMP from Intel and DOCP by AMD basically let users boost their RAM speeds automatically based on profiles tested by the manufacturers themselves. But here's the catch: if folks enable these features without checking what their motherboard can actually handle, things tend to go south pretty fast. Take DDR5-6400 XMP profiles for instance. Try running those on a cheap B660 motherboard and most times they just won't work because the board doesn't have enough power delivery capacity. Once someone does manage to activate these profiles though, it's crucial to test stability properly. Run something like MemTest86 overnight is what many enthusiasts recommend. Four hours minimum according to specs, but realistically people often leave it going longer just to be safe about data integrity issues down the road.
M.2 NVMe vs SATA: Choosing the right storage interface
NVMe SSDs using PCIe 4.0 deliver up to 7,000 MB/s—nearly 14x faster than SATA SSDs (550 MB/s). While SATA remains cost-effective for bulk storage, NVMe significantly improves real-world performance. Benchmarks show it cuts game load times by 25–40% and reduces 4K video rendering time by 32% on average (Tom’s Hardware 2024).
How M.2 slot configurations impact SSD performance
The M.2 slots on motherboards aren't all created equal when it comes to PCIe lanes and what interfaces they actually support. Put a PCIe 4.0 SSD into a slot that shares lanes with the graphics card, and performance drops by about half. What's really frustrating is finding out some slots will only work with SATA-based M.2 drives even though they look identical physically. This happens more often than people realize. Before spending money on new hardware, take time to check exactly which lanes are allocated where in the motherboard manual. Manufacturers sometimes hide these details in obscure sections, so double checking becomes essential for anyone wanting maximum performance from their storage setup.
| PCIe Generation | Max Speed per Lane |
|---|---|
| 3.0 | 985 MB/s |
| 4.0 | 1,969 MB/s |
| 5.0 | 3,938 MB/s |
Power Supply and Physical Fit: PSU and Case Compatibility
Calculating Total Power Requirements for Your Custom PC Build
Top tier graphics cards will typically consume between 300 and 450 watts of power, which means the whole system might need over 750 watts when building something serious for gaming or content creation. Most tech advisors suggest leaving around 20 to 30 percent extra capacity beyond what's needed at maximum load. This buffer helps manage those sudden power surges and makes room for future hardware upgrades too. According to data from EcoFlow released last year, systems built this way see about a two thirds drop in failures during intense workloads. There are also handy online calculators now available, such as the 2024 Modular PSU Calculator, that take care of all the complicated math involved in figuring out power requirements based on each component's thermal design power, accounting for energy loss factors, and considering physical space constraints inside the computer case. These tools follow the latest ATX 3.1 specifications to ensure they respond properly during those brief but critical moments when power demand spikes unexpectedly.
PSU Connector Compatibility: Matching Rails to GPU, CPU, and Drives
When building modern computer systems, there are certain power connectors that just cant be skipped. The motherboard needs a standard 24 pin ATX connector, while most high end processors demand at least two 8 pin EPS connections. For graphics cards that really pack a punch, we're looking at either a single 12VHPWR cable or several 8 pin PCIe connectors depending on what kind of GPU is installed. Before finalizing any build, it's essential to check if the power supply comes with these connectors built in rather than relying on adapters. Those adapter cables do create extra resistance in the system and tend to cut down overall performance somewhere around 8 to maybe even 15 percent when running heavy applications for extended periods. Native connectors simply work better in real world scenarios.
Modular vs Non-Modular PSUs and Cable Management Trade-Offs
With modular power supplies, users can disconnect cables they don't need, which helps air move better through the case and makes putting everything together much easier. The fully modular ones give builders total freedom, particularly when working on tight spaces where tangled wires really mess with how well the system stays cool. Semi-modular options fall somewhere in between these extremes. They cost around 15 to 25 percent extra compared to basic non-modular models, but worth it for cleaner cable management most people find worthwhile. When building something small like an ITX rig, folks tend to go for full modular SFX power supplies even though they come at about 10 to 15 percent higher cost than regular ATX units. The tradeoff just makes sense for those limited spaces.
Case Fit and Form Factor Alignment: Avoiding Physical Mismatches
Most standard ATX cases can handle power supplies around 180mm long, though plenty of those big 1200W plus models actually stretch past 200mm mark. That becomes a real headache when working with dual chamber cases where space is already limited. For small form factor builds, builders need to go with either SFX or SFX-L power supplies instead. These smaller units work better with cramped GPU clearance situations, sometimes fitting into spaces as tight as 45mm between components. When shopping for a new PSU, it's always worth checking the official ATX Form Factor Standards documentation. This helps confirm whether the unit will physically fit inside the chosen case considering all those important details like overall depth requirements, where the mounting holes are located, and how the fan sits in relation to airflow within the case itself.